https://www.allcreativedesigns.com.au/pages/leaf_characteristics.html
https://www.allcreativedesigns.com.au/pages/galltrees.html
https://www.thespruce.com/twelve-species-of-gum-trees-3269664
https://vicflora.rbg.vic.gov.au/static/keys/eucalypts
My Thoughts on a Knife Training Course Manual Contents
I thought this was the best knife course introduction ever written so why change it. Not written by me!
The Knife; Why?
I’ve been watching “The Last Kingdom” until the new season of “Vikings” returns in the Autumn. Of course, I’m watching what they use in their camps, at war, in their daily lives and I noticed something; The Knife.
Not every man had a sword because not every man was a warrior. Not every man had a hammer, because not every man was a blacksmith. Not every man had a shepherd’s crook, because not every man was a herder.
But every man and even every boy had one thing…a knife.
That got me to thinking of how many ways it was important for them to have a knife. Of course, there are the obvious tasks that are familiar to woodcraft like woodworking and the processing of game & fish and crafting, but what don’t we think about? Personal protection? Offensive actions?
Yes, those things and something else…A sense of control.
The knife gave a man a sense of control over his region. The man without a knife would have to hope that they could find stones to turn into cutting tools, cutting tools that would wear down and break with material fatigue. It was just physics. Stone tools were just not as durable as metal tools were.
But the knife, the knife was reliable. It would perform in any weather. It was trustworthy. It never complained. It didn’t need to be fed. You paid for it one time and it served you forever.
It was as Corin, Conan’s father told him once regarding steel…
“You must learn its riddle, Conan, you must learn its discipline. For no one, no one in this world can you trust. Not men, not women, not beasts… This you can trust.” –Corin
A young boy being given a knife begins his path on to manhood. It was as my own grandfather taught me in the mountains how to respect the sharpness of the tool and how to care for them and store them.
It was as my own father taught me the days I worked by his side for years how they were to be treasured and valued more than any other possession because with steel, a man could feed his family and clothes them and shelter them and have abundance for them.
And throughout history, steel has decided battles and created civilizations and has changed the trajectory of mankind. And for us? Well for us, it gives us fire and prepares our quarry and provides shelter for us.
While Conan’s father shared with him the importance of steel, it was Thulsa Doom who actually revealed the Riddle of Steel to Conan…
“Steel isn’t strong, boy. Flesh is stronger; That is strength, boy. That is power: the strength and power of flesh. What is steel compared to the hand that wields it?” –Thulsa Doom
Man is weaker without steel and is stronger with it, but the strength behind that steel is always the man who wields it, not the steel itself and alone. Therefore, it’s a relationship.
Remember, steel does not need man, it is man that needs steel. And for me, for what I’ve learned, for how I’ve used it to do exactly those things that would give me life in the harshest of conditions out in the woods as it has throughout my life working in the real world, that is why I see a knife differently than the overwhelming majority of the world.
Only men who’ve earned their livings with knives and tools understand their importance. So I don’t swoon for exotic handles or decorative colored liners or faux patinas. I don’t incarcerate them in display cases or wrap them in soft fabrics. I introduce them to wood and to hide and to meat and to blood.
And I only wield knives I could trust my life to.
–Yankee
I really wanted to start a knife training course. I have seen a lot of misinformation on social media sites and forums when newbies ask questions. I can talk about blades all day long. I just wanted to take people out and show them. Have a brief handout from the following links they can use as a pre-reading information booklet to ask questions about, or rather to give them the right questions to ask. At one time I had well over 600 knives and have gradually whittled down my obsession to under 80. Keeping my favorites and selling the ones I didn’t use often enough. Rarely owning a safe queen. There is a niche area of training that most courses Ive been on just dont cover. I thought I could make some extra money teaching what I like. BLADES!I don’t know of many people that would open up a lock box full of custom knives to strangers and say lets play.
Bevels – primary, secondary, tertiary
Cuts – chop, push ,slice, whittle, tip cope, edge cope, draw, shearing, thrust
Grinds – flat, hollow, chisel, convex
Steels – stainless, carbon, super steels
Tempering – hardening
Parts – tang, clip, ridge line, ricasso, choil, belly, false edge, grind plunge
Grips – reverse, hammer, ice pick,fencers, sabre
Sharpening
LINKS
To put it bluntly, what this guy doesnt know, isnt worth knowing
https://www.jayfisher.com/Blades.htm
Grinds
http://www.ragweedforge.com/grind.html
Knife Terms
http://www.knifeart.com/cusknifen.html
Steels
http://users.ameritech.net/knives/steels.htm
Steels
http://ajh-knives.com/metals.html
Steels
http://www.agrussell.com/knife_information/a/73/
Knife Tests
Plain VS Serrated Edges
http://www.sff.net/people/pff/edge.txt
Sharpening
http://www.oldjimbo.com/survival/sharps.html
Blade Anatomy
http://www.jayfisher.com/knife_anatomy,_parts,_names.htm
Heat Treating
http://www.anvilfire.com/FAQs/knives01.htm
Making your Own
http://www.primitiveways.com/pt-knives-1.html
Heat Treating
http://sixshootercommunity.com/articles/harry_o/heat_treating.html
Grinds
https://knife-depot.com/pages/a-guide-to-knife-grinds
https://agrussell.com/knife-articles/blade-grinds
Steel Comparisions
knife safety
try stick
carving
knife carving tools
https://www.sylvaspoon.com/blog/2020/6/6/spoon-carving-tools
basic notches
10 projects
When The C word happened everyone went berserk and brought every seed in the shops but had no idea how to grow them. What to grow or at what time of year to plant. When everything settled I thought it was a good time to buy seeds for myself.
Im going to compare this to bug out bags. How Independent do you want to be?Do you just want to feel safe or do you want something that works? I can see of most Bug out bags on the net, they dont work! Theyll get you home or to some where your headed but not for what their intended for. Look at long distance hikers. The amount of food they require for 8 to 10 days of hiking to keep up calories. Then they have food drops every week.
So this is going to be based around several layers. If you just want to feel safe then its an easy $40 for the survival seed pack. This will require some study as to when to grow the seeds. Or the next level are the seasonal seed packs with directions on when to grow.
The other questions to ask yourself are. Are you growing vegetables for yourself, a large family, are you intending to sell or trade surplus. Will you be saving seeds for the next year.
I cant answer all these question but I can point you in the right directions of which to ask. I could give a specific number of seeds to purchase but Id have people arguing the numbers so to make it easy Ill do it this way. Purchase one packet of say winter vegetables for one year, two packets for a large family, three packets if your saving seeds. Four packets if your intending to trade produce.
Other things to consider are. Medicinal plants, Green manure crops, Bug repeal ant crops and companion Planting. Staple crops such as corn and burdock roots.How far do you want to go and how much do you want to spend.
The three sisters or as I call them the five sisters. Corn grown with squash and beans to provide a complete amino acid chain. Grown together with rat tail radish and amaranth. Sun Flower can also be used in the mix. The last two are to help with disguising against pests.
Ive steered away from potatoes as a staple for the need of seed potatoes. Preferring Burdock, okra, corn and yams. Growing corn varieties that are designed for bread making. Youll notice three varieties of corn these need to be planted two weeks apart to prevent cross pollination.
What Ive done
Essentially what I’ve done is, Brought one each of the summer, winter, spring and autumn seed packs. These are for the first year. Ive purchased one packet of the Survival Seeds mix. These are to cover me for the second year, if I cant collect enough seeds from the first year or pests destroy too many seed heads. Of the smaller packets such as tomatos and salad crops. Ive brought 4 of each to have enough seeds for two years. Everytime I see a sale of heirloom seeds at a hardware store I then buy more of my favorites such as cherry tomatos. Eventually getting into berry crops, being faster to grow and crop than tree fruits.So far Ive spent close to $600 on seeds and as yet to purchase green manures or berrys and Im not qualified to even think about medicinal herb use.

Temperate Climate Australia
Burdock and Okra
4 Seasons Seeds
https://www.4seasonsseeds.com.au/epages/4seasons.sf/en_AU/?ObjectPath=/Shops/4seasons_seeds/Categories
New Guinea bean
Hopi corn
Anasazi corn
Sald greens – land cress, mibuna, corn salad, pak choy, tatsoi, rocket, mustard golden streaks ,mizuna, miners lettuce.
Grow Heirloom seeds
https://growheirloomseed.com.au/
amaranth
https://www.theseedcollection.com.au/flower/amaranth
Backyard Seeds
Survival seed pack
10 autumn seed pack
10 spring seed pack
10 summer seed pack
10 winter seed pack
Alliums 4 pack
Herb seed collection
Rare tomato seed collection
Black Russian Tomato x 20
Red Currant Tomato x 20
Yellow Pear Tomato x 20
Tigerella Tomato x 20
Snow White Tomato x 20
Long Tom Tomato x 20
Berrys and Fruit trees
https://www.heritagefruittrees.com.au/
Yams
https://greenharvest.com.au/Plants/SweetPotatoToYam.html
Soil Improvers Green Manure
https://greenharvest.com.au/Plants/SoilImprovers.html
https://www.theseedcollection.com.au/Green-manure
https://www.diggers.com.au/shop/vegetables/green-manures/
Summer Legumes: cowpea, lablab, mung bean, soybean, lucerne
Summer Grasses: buckwheat, French white millet, Japanese millet
Winter Legumes: fava bean (broad bean), fenugreek, lupins, sub clover, red clover, white clover, woolly pod vetch, chick pea
Winter Grasses: barley, oats, rye, wheat, buckwheat
Winter/Summer other: Biofume mustards, beets, corn salad, endive, kale, mustard, purslane, rocket, radish, spinach, turnip
Reasons to grow a Green Manure Crop’
to protect and feed soil when it is lying fallow between crops
to aerate soil
to improve moisture holding capacity of soil
to increase organic matter in soil
to suppress weeds
to provide flowers and habitat for beneficial insects
to increase worm population in the soil
to increase micro organisms in the soil
to add depleted nutrients to the soil
to prevent erosion
to reduce pest and diseases
to make your own mulch
Rat Tailed Raddish Pods
https://www.4seasonsseeds.com.au/Radish-Rat-tailed
Pest Managment species
· Alyssum, Carpet of Snow – attracts beneficial insects
· Basil, Cinnamon – repels mosquitoes and deters potato beetles
· Basil, Genovese – all around my favorite to repel almost everything
· Borage- repels tomato hornworms and deters squash bugs
· Calendula- to deter cabbage moths and aphids
· Chamomile, German
· Chives- to deter aphids and Japanese beetles
· Cilantro – to attract hoverflies
· Dill- helps cabbage family and attracts beneficial insects
· Marigold- to repel cabbage moths, potato beetles and squash bugs
· Nasturium- to repel aphids, potato bugs and squash bugs, but also to attract a lot of bugs away from your other vegetables
· Oregano- to deter a wide variety of insects
· Painted Daisy
· Parsley- to attract hoverflies
· Petunia, Dwarf Mix – repels aphids
· Sage- to deter cabbage moths and carrot flies
· Sunflower- to attract bug eating birds
· Thyme- to deter cabbage moths
· zinnia- to attract Japanese beetles away from your beans
Medicinal Herb Garden
· Anise Hyssop
· Basil, Genovese
· Basil, Holy
· Bee Balm
· Chamomile, German
· Catnip
· Calendula, Pacific Beauty
· Cilantro
· Dill, Bouquet
· Korean Licorice Mint
· Lavender, Vera
· Lemon Balm
· Lemon Mint
· Spearmint
· Echinacea
· Parsley, Flat leaf
· Plantain
· Yarrow
Companion Planting Guide
Basil
Plant near: most garden crops
Keep away from: rue
Comments: improves the flavor and growth of garden crops, especially tomatoes and lettuce. Repels mosquitoes.
Beans, Bush
Plant near: beets, cabbage, carrots, catnip, cauliflower, corn, cucumbers, marigolds, potatoes, savory, strawberries
Keep away from: fennel, garlic, leeks, onions, shallots
Comments: potatoes and marigolds repel Mexican bean beetles. Catnip repels flea beetles.
Beans, Pole
Plant near: corn, marigolds, potatoes, radishes
Keep away from: beets, garlic, kohlrabi, leeks, onions, shallots
Comments: same as for bush beans.
Beets
Plant near: broccoli, brussels sprouts, bush beans, cabbage, cauliflower, chard, kohlrabi, onions
Keep away from: charlock, field mustard, pole beans
Comments:
Borage
Plant near: squash, strawberries, tomatoes
Keep away from:
Comments: repels tomato worms. Improves flavor and growth of companions.
Broccoli and Brussels Sprouts
Plant near: beets, buckwheat, calendula, carrots, chamomile, dill, hyssop, marigolds, mints, nasturtiums, onions, rosemary, sage, thyme, wormwood.
Keep away from: strawberries
Comments: marigolds repel cabbage moths. Nasturtiums repel aphids.
Cabbage and Cauliflower
Plant near: broccoli, brussels sprouts, celery, chard, spinach, tomatoes.
Keep away from: strawberries
Comments: tomatoes and celery repel cabbage worms.
Cantaloupe
Plant near: corn
Keep away from:
Comments:
Carrots
Plant near: cabbage, chives, early potatoes, leeks, lettuce, onions, peas, radishes, rosemary, sage, salsify, wormwood.
Keep away from:
Comments: onions, leeks, and wormwood repel carrot flies
Chives
Plant near: apples, berries, carrots, grapes, peas, roses, tomatoes.
Keep away from:
Comments: Improves flavor and growth of companions. Deters aphids and Japanese beetles.
Corn
Plant near: beans, cucumbers, early potatoes, melons, peas, pumpkins, soybeans, squash.
Keep away from:
Comments: soybeans deter chinch bugs.
Cucumbers
Plant near: beans, cabbage, corn, early potatoes, radishes, sunflowers.
Keep away from: late potatoes
Comments: Radishes deter cucumber beetles. Cucumbers encourage blight in late potatoes.
Dill
Plant near: broccoli, brussels sprouts, cabbage, cauliflower, cucumber, lettuce, onions
Keep away from: carrots
Comments: Improves flavor and growth of cabbage family plants.
Eggplant
Plant near: green beans, peppers, potatoes, tomatoes
Keep away from:
Comments: green beans deter Colorado potato beetles.
Garlic
Plant near: cabbage, cane fruits, fruit trees, roses, tomatoes
Keep away from: peas, beans
Comments: deters Japanese beetles and aphids. A garlic oil spray deters onion flies, aphids, and ermine moths. A garlic tea helps repel late potato blight.
Kale
Plant near: aromatic herbs, buckwheat, cabbage family, marigolds, nasturtiums
Keep away from: pole beans, strawberries
Comments:
Kohlrabi
Plant near: cabbage/cauliflower companions (except tomatoes)
Keep away from: fennel, pole beans, tomatoes
Comments: kohlrabi stunts tomatoes
Lettuce
Plant near: beets, carrotsparsnips, radishes, strawberries
Keep away from: cabbage family
Comments: lettuce tenderizes summer radishes.
Marigolds
Plant near: all garden crops
Keep away from:
Comments: stimulates vegetable growth and deters bean beetles, aphids, potato bugs, squash bugs, nematodes, and maggots.
Marjoram
Plant near: all garden crops
Keep away from:
Comments: stimulates vegetable growth.
Mustard
Plant near: alfalfa cover crops, fruit trees, grapes, legumes
Keep away from:
Comments: stimulates growth of companion plants.
Nasturtiums
Plant near: apples, beans, cabbage family, greenhouse crops, potatoes, pumpkins, radishes, squash
Keep away from:
Comments: repels aphids, potato bugs, squash bugs, striped pumpkin beetles, and Mexican bean beetles and destroys white flies in greenhouses.
Onions
Plant near: beets, cabbage family, carrots, chamomile, lettuce, parsnips
Keep away from: beans, peas
Comments: deters most pests, especially maggots.
Oregano
Plant near: all garden crops
Keep away from:
Comments: deters many insect pests.
Parsley
Plant near: corn, roses, tomatoes
Keep away from:
Comments:
Parsnips
Plant near: onions, radishes, wormwood
Keep away from:
Comments: onions and wormwood help keep root maggots from parsnips.
Peas
Plant near: beans, carrots, corn, cucumbers, early potatoes, radishes, turnips
Keep away from: garlic leeks, onions, shallots
Comments:
Peppers
Plant near: basil, carrots, eggplant, onions, parsley, tomatoes
Keep away from: fennel, kohlrabi
Comments:
Potatoes
Plant near: basil, beans, cabbage family, corn, eggplant, flax, hemp, marigolds, peas, squash
Keep away from: apples, birch, cherries, cucumbers, pumpkins, raspberries, sunflowers, tomatoes, walnuts
Comments: hemp deters phytophthora infestans. Basil deters potato beetles. Marigolds (dug into crop soil) deter nematodes.
Radishes
Plant near: chervil, cucumbers, lettuce, melons, peas, nasturtiums, root crops
Keep away from: hyssop
Comments: radishes deter cucumber beetles. Chervil makes radishes hot. Lettuce helps make radishes tender. Nasturtiums improve radishes’ flavor.
Rosemary
Plant near: beans, cabbage, carrots
Keep away from:
Comments: repels bean beetles, cabbage moths, and carrot flies.
Sage
Plant near: cabbage family, carrots, tomatoes
Keep away from: cucumbers
Comments: deters cabbage moths and carrot flies. Invigorates tomato plants.
Soybeans
Plant near: corn, potatoes
Keep away from:
Comments: chokes weeds and enriches soil.
Spinach
Plant near: celery, cauliflower, eggplant, strawberries
Keep away from:
Comments:
Strawberries
Plant near: borage, bush beans, lettuce, pyrethrum, spinach
Keep away from: cabbage family
Comments:
Sunflowers
Plant near: cucumbers
Keep away from: potatoes
Comments: can provide a trellis and shelter for shade-loving cucumbers.
Swiss Chard
Plant near: bush beans, kohlrabi, onions
Keep away from: pole beans
Comments:
Tarragon
Plant near: all garden crops
Keep away from:
Comments: improves vegetables’ flavor and growth.
Thyme
Plant near: all garden crops
Keep away from:
Comments: deters cabbage moths.
Tomatoes
Plant near: asparagus, basil, cabbage family, carrots, gooseberries, mustard, parsley, onions, rosemary, sage, stinging nettles
Keep away from: fennel, kohlrabi, potatoes, walnuts
Comments:
Turnips and Rutabagas
Plant near: peas
Keep away from: knotweed, mustard
Comments: mustard and knotweed inhibit the growth of turnips and rutabagas.

January: Capulin cherries, blueberries, plums, plumcotts, late apricots, pawpaws, lemons, lychees, strawberries and all the brambleberries, peaches, nectarines, plums.
February: Apples, figs, blueberries, jackfruit, jaboticoba, guava, pepinos, lychees, nashi, pears, rockmelons and watermelons, more berries.
March: Apples, olives, avocadoes, custard apples, lychees, brambleberries, early quinces, early persimmons, pears, melons, grapes, strawberries and brambleberries.
April: Pomegranates, medlars, pears, Valencia oranges, lemons, early limes, olives, late figs, quinces, Granny Smith and other medium late apples, passionfruit, tamarillos, late grapes, chestnuts, walnuts, persimmons, grapefruit, guavas, feijoas, strawberry guavas, carob, chestnuts, Brazilian cherries, pomegranates, guavas, jackfruit, early calamondins, lillypillies, kerriberries, late strawberries, raspberries, bananas, avocadoes, Irish strawberry-tree fruit, melons, pistachios and pecans.
May: Figs, early mandarins, limes, pomegranates, late apples, late Valencia or early Navel oranges, tangelos, citrons, kumquats, tamarillos, early kiwifruit, late passionfruit high up on the vine, late raspberries, late strawberries if grown on a high garden away from early frost, olives, persimmons if the birds havent finished them, feijoa, bananas, medlars.
June: Apples (Lady Williams, Sturmer Pippin, French Crab), feijoa, Navel oranges, kiwifruit, limes, mandarins, citrons, grapefruit, bananas, avocadoes, late passionfruit high on the vine, banana passionfruit, guava, strawberry guava, pomegranates if the birds havent eaten them, lillypillies in warm areas, citrons, medlars, olives, late tamarillos above the frost, winter rhubarb.
July: Apples (Lady Williams, Sturmer Pippin, French Crab), feijoa, Navel oranges, kiwifruit, limes, mandarins, citrons, grapefruit, bananas, avocadoes, late passionfruit high on the vine, banana passionfruit, guava, strawberry guava, pomegranates if the birds havent eaten them, lillypillies in warm areas, citrons, medlars, olives, late tamarillos above the frost, winter rhubarb.
August: Sturmer Pippin or Lady Williams apples that improve when stored and wrinkled, unlike most other fruit, stored quinces, Navel oranges, lemons, lemonade fruit, custard apples in warm areas, tangelos, mandarins, cumquats, calamondins, pomelos, shaddock, satsuma, lillypillies in warm areas, Atherton raspberries in warmer areas, Japanese raisin fruit (swollen stems), kiwifruit, grapefruit, avocadoes, a few macadamia nuts, rhubarb and Tahitian and kaffir limes.
September: Navel oranges, lemons, grapefruit, cumquats, calamondins, limes, tangelos, tangor, mandarins, avocadoes, small alpine strawberries (not the large, new varieties that fruit later), Japanese raisin fruit, lillypillies, pawpaw in warmer areas, Cape gooseberries if they havent been frosted off (autumn will mature now), ditto tamarillos, early loquats and rhubarb.
October: Loquats, Navel oranges, lemons, limes, tangelos, tangor, mandarins, grapefruit, cumquats, calamondins, pomelos, citrons, Tahitian limes, kaffir limes, citrons, early blueberries, lillypillies, Japanese raisin fruit, avocadoes, early strawberries, early raspberries in warm spots, rhubarb, banana passionfruit and tamarillos ripening from last season. Keep eating stored Lady Williams apples and nuts.
November: Cherries, early peaches, early nectarines, early apricots, small early plums, loquats, oranges, mandarins, citrons, bush lemons, early Capulin cherries, lemons, limes, grapefruit, tangelos, avocadoes, strawberries, blueberries, early loganberries, Japanese raisin fruit, lillypillies and early raspberries.
December: Cherries, nectarines, peaches, plums, apricots, passionfruit, banana passionfruit, gooseberries, Cape gooseberries, Valencia oranges left on the tree, lemons, strawberries, raspberries, blueberries, boysenberries and other brambleberries such as loganberries, Capulin cherries, lillypillies and sometimes early figs.
JF 2012
On the Australian Survival and Bushcraft Basic Course Gordo had us running around collecting TINDER I put this in capitals because it became not only a habit but a compulsion. That many of us are still doing it weeks after the course.
We started off individually starting fires and taking 20 minutes to do so. This eventually became 5 minutes. The idea being not only to increase stress levels to make you know how important starting a fire was in certain situations. Like for signalling or to keep someone warm after becoming wet but also to increase the skill levels of procuring materials faster and more efficiently. By not grabbing a few pieces here and there but to grab as much as possible, if it doesnt break then it isnt dry enough and to procure as much as possible in the smallest amount of time. Clear an area 2 meters, put down a fire lay, sort materials into kindling, pencil sized and then thumb sized pieces.
On top of this have tinder ready in your pockets at all times. Being prepared. At the time this seemed more of a competition than something needed but after 18 people clearing an area tinder became harder to find. Im also staying in an area now where I have found nothing in the way of tinder. You grab it while you can was the lesson.
I was a tree surgeon for many years and when I look at trees i see how they need to be pruned, if they are diseased and need to be cut down, habitat for animals,the type of soil required by certain trees. Now when I look at trees I look for materials to build shelter, tinder, kindling which is all prevalent on the area and plants growing there. Im also looking at natural navigation features of prevailing wind direction to be able to position the shelter in the right direction for shade and rain run off.
I read a book called EMERGENCY by Neil Strauss. which I must have now reread 10 times by now and would recommend it. Everytime I read it I get another idea. A post that came up on the FB news feed (When I was on social media)the other day said something like.”do you want to delete a post after reading it because your not the same person you were 4 minutes ago”. Well everytime I reread that book I wasnt the same person I was 4 months ago and am reading it from a different perspective.
So Im taking something else from that book this time and adopting a training method so I dont loose my skills and keep testing myself and learning. By setting aside an hour a day to do the following;
Shelter Mondays, Water Tuesdays, Wednesdays Bushcraft Cooking, Tracking Thursdays, Primitive Hunting Fridays, Saturdays Edible Plants, and Sundays Cordage.
Its one thing to know how to do something like build a shelter but its quite another thing to have the confidence to do it in various areas, expediently without leaks with different materials. today is cordage Sunday. I have no natural cordage available so Im trying to locate raffia from spotlight to keep practicing my cordage and fish trap building skills.
“The more you carry in your head, the less you carry on your back”
Paraphrased from Mors Kochanski
Choosing a Bokken or Jo;
with a bit on Shinai and kali sticks in there too
“Before I learned an art,a punch was just a punch and a kick was just a kick.
After I learned the art, a punch was no longer a punch, a kick, no longer a kick.
Now that I understand the art, a punch is just a punch and a kick is just a kick.”
Bruce Lee
My Kali instructor has a habit of always using this quote after teaching us something complicated. Which is infuriating and calming at the same time. He will show us, say for example a punch. Then several ways of doing that punch, applications of that punch, combinations of that punch and on and on until saying that quote. Essentially saying Ive just showed you 50 things about this punch but after all that, once you understand its still just a punch. Meaning dont get stressed, enjoy the journey, understanding will come.
Which is exactly what Im going to do with this article. I could write a 200 page article that no one will ever read, going on about weight , curvature, length,design comparison, timbers, etc or just start by saying. “A stick is just a Stick”.
Its much easier just saying what Ive done and the reasons why and doing an introduction to the research below that goes into great depth and readers can then pick and choose what parts interests them.
First lesson. Enjoy. The other day I shaved my arm and wrote from one to ten in Japanese. The instructor and senior student probably thought I was nuts but I was determined to count to ten through the suburi (solo strikes). Indonesian,Spanish and German I can do although very rusty but Japanese Ive always found hard. It didnt matter I was there to learn and to have fun.
Below are the research materials that I was going to use which list the different styles used, weights, curvature, teacher preferences, parts of a bokken, timbers, break tests, maintenance, inscriptions, etc.
If your a beginner its all crap and if your in Australia you have only a few options. If your an instructor you buy Red Oak, because if you have to buy 10 for a class to use its cheaper. If you become more interested and want to own your own Bokken or Jo then choose White Oak its a little denser and will last longer. Ive been to too many classes where the Red Oak has cracks already developing.This is all the local martial arts shops will sell.
If you decide weapons training is something you really like and want to continue with then read the research material below and it will blow your mind and then remember the heading of this article. Its a stick, dont get stressed. Being in Australia there is one consideration over all the other reading material. Cost of shipping. Double check this before ordering anything overseas. You can find the most beautiful bokken ever made for $50 and then find out it will cost $300 to send it through the mail.Thats in $USD.
I collect and train with live blades and wooden weapons, so I go a little overboard when it comes to learning about them, the types of steel, designs, materials etc. So Ive done the hard work for you and have all the links below and you can take it to which ever level you desire.
There are a couple of things. One – will a heavy Bokken overcome a lighter weight bokken? (Heavy vs Light bokkens). I read somewhere that a heavy bokken will over come a light bokken, but if Im learning right then the weight shouldnt matter it should be the technique of absorbing and defectling and the speed of a lighter bokken should have better recovery and be faster than a heavy one!
1.Get off the line of attack and blend with the momentum of the attack;
2.Take the balance of your opponent; and
3.Redirect the attacking energy and momentum
“A heavy bokken is stronger and will be harder to break. But it is slower. It will have more momentum but since the power should be mainly from the hips and body movement, the weight of the bokken itself is not so important. If you train if you are fighting with sticks, the weight is maybe more important. If you train as if you’re fighting with real sharp swords. The weight becomes less important because only a light touch is enough to do serious harm.”
Sensei T
While on the subject Ill mention weight. Iwama bokkens is very heavy, the only time you buy Iwama is if you train in an Aikido club that teaches Iwama style or your trying to use a heavy weight Bokken for strength training. I own a Kamagong Bokken that weighs 920grams, Iwama weigh 950grams. I can manage to use this for around 20 minutes and thats it. Too heavy and I need to swap to a lighter style before my back plays up. I use this for a 10 minute warm up when training solo and then swap to a mid weight. This allows me to train for an hour without causing injury. If you have shoulder or back injurys pay attention to the weight of the bokken.The reason I start off with a heavy weight is for two reasons, one to build up my strength and the second to make myself more mindfull of what Im doing.
Timber materials; I like Hickory. Its the only timber that Bokken Review, in links below could not break. I own two white oak bokken in a wakizashi style to match the two swamprat Rucki live blades I own for training in short double sword in kali. Other than that I own Hickory from Kingfisher Woodworks for Aikido. It will last me a lifetime, if I take care of them.
Styles; Kingfisher sell eight different sytles. Most of which I have never heard of. Other than Iwama, the most popular (listed Below) are the Kenjutsu for bujikan practicioners. Thats for America, everyone here I know that trains bujikan will use bokken from the local martial arts shop. The longer grip 14″ (tsuka) is meant for traps and holds. My Cold Steel Ko-katana 24 inch Chisa warrior has an 11 inch Tsuka (grip) and this seems huge to me.
Yagyu – This was my first good quality bokken. It weighs only 16 oz compared to the Iwama at 22oz and the others models between 18-24oz. Its very light and manouerable. I prefer something a little heavier to buld my strength when training but with shoulder and back injuries I can last an hour and a half training with it and the speed will be good for sparring.
Shinto – The all rounder, probably beter suited to iaido for drawing with a sharper tip and for (AJKF) All Japanese Kendo federation dimensions. Same weight and dimensions as the Aikido Bokken but can be customised to suit different sytles. Also good for Shiato Aikido where there is little striking.There is no Musubi, the stickyness between the two weapons when they meet in contact within this style.
Aikiken – Same weight and overall length as the shinto but has a rounder tip (Kissaski) and is much safer for styles of Aikido where actual striking is taught for kumitachi (partner practice).
I asked the question of my Sensei
When I first started looking into finding a school in jo staff and Bokken I didnt realise that they could be combined. I thought that Jo would be taught seperately to bokken and it never occured to me that they could be taught together! Which do you think would have the advantage the Bokken or the Jo? As I read the story posted below of Muso Gonnosuke and the Shinto Muso-ryu Jo.
“It depends on who is holding them. The jo has the advantage that it is longer and you can use both ends and the middle. Being longer, it may tend to be a little slower. The bokken is shorter, faster and has very direct, precise movements. It may also be made a heavier wood. But basically the main advantage of sword techniques is that there is a sharp edge. Theoretically, anything you can do with a broken, you could do with a jo. However, Miyamoto Musashi ( the sword master on the story below) was meant to be the greatest swords master of all time. He stop using a real sword because he was tired of killing people in duels’.
Sensei T
Kamagong – A little off topic is my second favorite timber kamagong. I train multi-discipline weaponry arts. Kali/ Escrima sticks are generally Rattan because its cheaper than hardwoods but when its hit enough instead of cracking and splintering into shards, it stays in one piece and is safer for partner training. Bahi wood is harder and can be used for partner drills, it will withstand impact against another piece of Bahi but will shatter eventually. Kamagong (Ironwood) is for breaking bones. I find it usefull for solo drills. Instead of a light piece of material being moved around the denser kamagong is heavier and it requires you to midfully place it into position. Much easier to learn a technqiue this way.
My kali teacher who is always good for a story told me this on my first day of training and was my introduction to ironwood which made me hooked. He had been given a set of kali sticks by Guru Dan Inansanto and was told about when the conquistadors invaded the Philipines and the kamagong belonging to the philipine moros had broken the conquistadors sabres. I became enamoured with kamagong and found a good source on FB (long since lost)and ended up buying a set of sticks for each of my teachers, as not many trainers would take me on at the time due to injuries, but I like sharing the story of the conquistadors. Its not written down in many places.
One other tip Ive picked up which isnt well known is using olive oil instead of tung oil or linseed oil for maintenance of the timber! It leaves no residue.My carpenter told me this when I was enqirying about using decking oil.
Parts of a Bokken
Tsuka – the handle
Ha – the edge
Kissaki – the tip
Monouchi – the cutting portion of the edge, the 1/3 closest to the kissaki
Mune – the back of the blade
Chu-o – the middle third of the blade
Tsuba moto – the third of the blade closest the handle
Tsuba – the guard, not present on most Aikido bokuto
Shinogi – the ridge between the mune and the edge
Shinogi-ji – the flat plane between the mune and the shinogi
Jigane – the flat plane between the shinogi and the temper line (edge)
Tsuka gashira – strictly the pommel fitting, butt end of the bokuto
My collection;
JO’s
1) Cocobolo (my all time favorite timber) 30mmx4.5 feet
Handmade by Sangaku Bujutsu Renmei Custom Weapons
2) Hickory 25mmx50inches (my armpit height)
made by kingisher woodworks
3) Ironwood 25mmx4.5 feet
purchased from Fujimae NZ
(A friend once asked why I train in jo when I cant carry one around with me. A 4.5 foot length I can use as a hiking stick. It is a little easier learning technques when around the 4 foot length)
Bokken
1)kamagong 40 inches 920g
purchased from Fujimae NZ
2) Hickory Yagyu Style 10.5″ Tsuka, 40′ inch OA, minor axis 0.95″, major axis 1.3″, circumfriance 3.6″, weight 16oz
3) Hickory Aikiken medium style 11″Tsuka, 40″OA, minor axis 1″ ,major axis 1.5″,circumferance 4″ ,weight 19oz
made by kingfisher woodworks
4) Two white oak wakizashi cut to match live blades. Purchased locally. Although Im considering changing to two custom made shintos from kingfisher, with 15 inch short blades.
Kali Sticks
Kamagong round sticks 26″
Kamagong flat sticks 28″ garrote
multiple rattan sticks 24″-28″
(The length depends on the weight and thickness of material and what Im trying to work on. -speed, accuracy, strength, power, technique, style of art, etc.)
Shinai
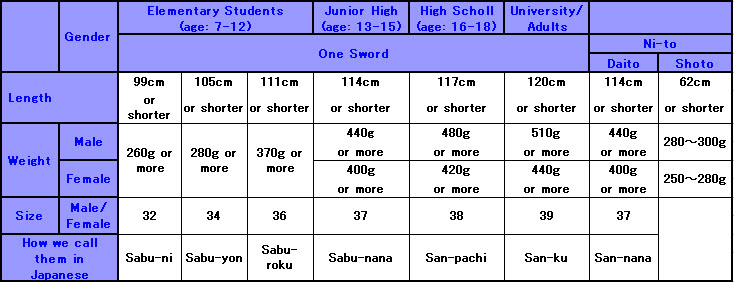
There are two types or should I say styles of Shinai; Dobari’ and ‘Chokuto’. One is used for training having a thicker tip section and the other for competitions where the weight is back further in the hand to increase speed. The thinner tips break faster and are only brought out for an advantage in a comp, while the thicker tips are used in partner practice. The lengths depend on age and sex, listed below in links due to the Kendo federation scoring system.
The grips are what gets to me. Im not a kendo student but do intend to start at some point or atleast a beginners course but I seem to get the same answers from the clubs Ive asked. “Its a personal choice”.
There are round/thin, round/thick, oblong and octagonal grips. My best opinion is; Thick grips for large hands, thin grips for small hands. Oblong for 3 reasons. 1) you cross train in other styles and want the grip to represent the squarer grips on live blades,2) many beginners have trouble keeping the cord to the top of the shinai and twist it in their hands. 3) you have problems keeping the shinai at a straight angle at the end of a cut, which with a live blade wont perform a cut through material and the oblong grip will help fix those problems.
Octagonal grips; Now in Amok and Kali you train over and over again till every strike is at the exact same angle, everytime. You actually make a point of grabbing beginners for two reasons. 1) On the street no one is trained so the strike angles are all over the place. So grab a beginner to simulate this. Itll relearn your brain from being accustomed to exact angles of attack and 2) It teaches the beginner to do exact angles of attack. Works both ways. So Im assuming by using an Octagonal grip you can tweek the angle of attack with precision and use it as a diversion in a competition and just come off the line of angle just enough so it confuses the mind of your opponent. Well thats my theory and Im sticking with it, till someone can tell me different. Once again in Australia and the chance of finding an octagonal grip to try is horrendous. Id like to know how comfortable the shape is in my hand.
Research
Best article to describe features between bokken for used in Kendo, Iaido, Aikido
https://www.tozandoshop.com/Articles.asp?ID=336
weight, finish, traditional timbers
https://www.seidoshop.com/pages/choosing-bokken-jo-woods
Light, heavy , standard weights, curvature. teachers choices.
https://www.seidoshop.com/blogs/the-seido-blog/04-the-choice-of-a-specific-bokken-for-aikido
Curvature (Sori), Tip/Point (kassaki), Back of blade (mine),Tsukagashira(pommel/butt),Atsumi(thickness), Tsuba(handguard),Hi/Bohi(groove)
Everything Read First
http://cookdingskitchen.blogspot.com/2016/09/all-about-wooden-weapons-for-martial.html
Timbers – intense reading makes me want to seek out some local Gidgee and make my own.
Break tests Read Second also a youtube channel
https://bokkenreview.wordpress.com/
Standard and Exotic woods
http://www.crane-mountain.com/styled-2/index.html
A good way to spend a week reading, great guy for advice.
http://www.egreenway.com/taichichuan/canearts2.htm
more cane related
http://www.canemasters.com/index.php?main_page=index&cPath=9
Good intro, read third but only Iwama style mentioned.
http://www.northsydneyaikido.com.au/aikido-bokken/
http://www.northsydneyaikido.com.au/aikido-bokken-boken-bokuto/
Care and Miantenance
Inscriptions collasal amount of information
https://www.kingfisherwoodworks.com/kanji-inscription-information.html
wood grades for hickory
https://www.kingfisherwoodworks.com/wood-grade-information.html
Measuring a jo
https://www.kingfisherwoodworks.com/choosing-a-jo.html
Bokken types in hickory
Hickory style specifications
https://www.kingfisherwoodworks.com/bokken-specifications.html
Impact Strength PDF
http://www.jorthgar.com/wp-content/uploads/2015/03/choosing-timber.pdf
What you learn from making your own
making your own bokken (PDFs need to be downloaded to read)
http://www.northsideaikido.com/en/dojo-downloads
Check out youtube for hints on making your own
How to choose a Shinai
https://www.tozandoshop.com/Articles.asp?ID=332
https://www.e-bogu.com/Top-Grade-Madake-Shinai-s/308.htm
Shinai sizing guide
https://www.kendo-guide.com/images/shinai-size-L.jpg
Supplies
https://www.tozandoshop.com/Tozando-Custom-Workshop-Bokken-p/01[x]-999.htm
http://www.pmasupplies.com/Japan/bokken.html
https://bushikatagiweapons.com/
Kamagong
http://www.pmasupplies.com/Philippines/sticks.html
https://www.kriscutlery.com/phi/kamagong-ebony-arnisescrima
Custom Laminated
https://sdksupplies.netfirms.com/
Hickory
https://www.kingfisherwoodworks.com/
Handmade
https://www.facebook.com/sangakubujutsurenmeiweapons
Shinai
http://www.bogushop.com/search.asp
https://kendostar-international.com/
Kali Sticks
https://www.progressivemartialarts.com.au/shop/16-short-stick
For the best Rattan Sticks Ive found in Australia talk to Cookie at Progressive Martial Arts.
https://www.coldsteel.com/balicki-stick.html
Training knives
https://noktrainingknives.webs.com/
Muso Gonnosuke and the Shinto Muso-ryu Jo
by Wayne Muromoto
If we can believe the legends–and there are more legends than facts concerning these two martial artists–the only person to beat Miyamoto Musashi in a duel was someone as outlandish and eccentric as he was. And to top it off, he did it with a wooden stick. In so doing, Muso Gonnosuke Katsuyoshi gave birth to a martial arts system that would elevate the humble wooden staff to one of the preeminent weapons of the bugei of Japan. We know very little that can be verified about the actual life of Muso Gonnosuke, and the little that we do know must be tempered with the knowledge that much of what has been written has been colored and embellished by later writers to make for exciting reading. Nishioka Tsuneo, head of the Seiryukai organization, cautions that many of the legends purporting Gonnosuke to be a colorful braggart originated long after his actual lifetime. “We just don’t know that much about him,” Nishioka says. In any case, records note that Gonnosuke’s original family name was Hirano, and that he went by the given name of Gonbei early in his life. He was supposed to be a distant descendant of Kiso Kanja No Taiyu Kakumei, a retainer of the famous general, Kiso Yoshinaka. Gonnosuke studied the Tenshin Shoden Katori Shinto-ryu under Sakurai Ohsumi No Kami Yoshikatsu, then he studied the Kashima Jikishinkage-ryu, learning its secret method called the “ichi no tachi”. According to legends, Gonnosuke thereupon engaged in various duels throughout Japan to test his skills, never losing any of them until he met Miyamoto Musashi. To be sure, there were wooden staff arts before Gonnosuke’s time. The Tenshin Shoden Katori Shinto-ryu had bojutsu methods using the rokushaku bo (six-foot staff), as did the Sekiguchi-ryu, Bokuden-ryu and Takeuchi-ryu (or, as it is alternatively called, Take-no-uchi-ryu). If we follow the lineage line charted in the Bugei Ryuha Daijiten, then Gonnosuke was a student of a teacher of the Tenshin Shoden Katori Shinto-ryu, which is why his style, the Shinto Muso (or Shindo Muso) -ryu contains the appellation Shinto (Way of the Gods).
The Duel With Musashi and Mount Homan
The first duel with Musashi occurred in Keicho 10 (1605), just five years after the Battle of Sekigahara put an end to most internal civil wars and heralded the start of the two-centuries-long Tokugawa peace. The event was supposed to have taken place in Akashi, Harima province. There are different versions of the first duel. A rather silly but entertaining one is concocted by Yoshikawa Eiji in the novel Miyamoto Musashi. However, the first records of such a duel is found in the Kaijo Monogatari, written in 1629. The gist of its version was subsequently published in the Jodo Kyoshi. The following is a synopsis of that episode: There was a heihosha (martial artist) named Miyamoto Musashi. He engaged in duels from the age of 16 and was in about 60 matches. In the sixth month, in Akashi, Harima province, he met Muso Gonnosuke, who was a six foot tall strapping warrior. Gonnosuke was armed with an odachi (a long sword), a two layer overcoat with sleeves, and a haori with a large hi no maru (rising sun). On his lapels were written: “The best martial artist in the land” (heiho tenka ichi), and “Nihon Kaizan Muso Gonnosuke.”…Gonnosuke was surrounded by about six deshi followers who accompanied him on a journey to Kyushu. He boasted to Musashi that no one was his equal. In his travels, he had apparently encountered Musashi’s father, Shinmen Munisai, a master of the jutte (truncheon).”I have seen your father’s techniques, but I haven’t seen yours,” he said, goading Musashi. (Shinmen) Miyamoto Genshin Musashi was irritated. He was in the middle of carving a willow branch and replied, “If you saw my father’s techniques, I am no different.”Gonnosuke pressed the issue, badgering Musashi to show his martial arts off for the benefit of Gonnosuke’s students.”My heiho is not for display,” Musashi snapped. “No matter how you attack me, I’ll stop it. That’s all there is to my heiho. Do what you will, with any technique.”Gonnosuke pulled out a four-shaku (a shaku is roughly equivalent to an English foot) wooden sword from a brocade bag. (To draw a comparison, the usual practice sword is but a little longer than two shaku.) He attacked Musashi without any formalities. Musashi stood up from his crouch. With what seemed to be very little effort, he forced Gonnosuke back across the tatami mat room with his willow branch and, pressing him against a wall, struck him lightly between the eyebrows. Another slightly different version of that first duel appears in the Honcho Bugei Koden. The book was originally compiled in Shotoku 4 (1714). Watatani, in his edited and annotated version of the Honcho Bugei Koden, notes that the Nitenki, a compilation of Musashi’s exploits by his followers, places the event in Edo, but this appears to be a later corruption. The earliest record of this duel appeared in the Kaijo Monogatari, but 26 years after Musashi’s death, and it places the battle in Akashi. The description of the duel in the Honcho Bugei Koden is more or less the same as in the Kaijo Monogatari, with some minor differences. In this version, Musashi was carving the willow branch into a toy bow used for sideshow games. It was a thin piece of wood only two shaku or so in length. Musashi invited Gonnosuke into a seven and a half mat room. In actuality, it is probable that Musashi beat Gonnosuke by using his special two-swords technique (nito), trapping Gonnosuke’s weapon in an x-block, or juji dome, with his long and short swords. Musashi was able to trap an opponent’s weapon with the block, forcing the attacker to either give up or retreat and face an immediate counter-attack. Gonnosuke must have been a large, strapping warrior, if he wielded such a large bokken or bo. A wooden sword attributed to Gonnosuke at Chikuwa Shrine is over four shaku, nine sun and two bu (over four feet) long. Gonnosuke’s jo, if measured by the width of his outstretched hands held out to his sides, must have been a bit longer than the standard jo used nowadays. Whatever the case may be, Gonnosuke lost the first duel. Mortified, he withdrew to Homangu, part of the Kamado Shinto shrine atop Mount Homan, in Chikuzen province, (present-day Dazaifu, Fukuoka Prefecture) Kyushu. For 37 days he meditated and performed rites of austerity. On the last night night, while praying in front of an altar, he collapsed and had a divine vision. In one version, a heavenly child appeared and said, “Holding a round log, know the suigetsu (an attack point on the body).” The cryptic vision compelled Gonnosuke to whittle a short staff about four shaku, two sun and one bu in length (128 cm.). This was longer than the standard tachi long sword of that period, which was three shaku, two sun and one bu, but shorter than the long rokushaku bo. By taking advantage of the short staff’s ability to shift rapidly in the hands of a skilled artist, Gonnosuke was able to beat Musashi in a second duel. It is unclear how Gonnosuke did that, but the use of the jo in present-day Shinto Muso-ryu practice might give us a hint. If a jo is blocked by a juji-dome, it is an easy matter to quickly flip the jo out of the block and in the same motion strike a kyusho (weak point) on the swordsman’s body. Gonnosuke also created a system of five secret methods (hiden gyo-i) that incorporated all the techniques of his new jo style. Gonnosuke managed to defeat Musashi without causing him great harm. Gonnosuke became martial arts instructor to the Kuroda clan, located in northern Kyushu. Muso Gonnosuke, profoundly changed by his encounter with Musashi and by the divine vision atop Mount Homan, had created a preeminent staff art, the Shinto (or Shindo) Muso-ryu jojutsu. The Heavenly Way of Muso’s staff…
Afterwood
It was suggested that I write an afterwood when I started sending off this article to different instructors and busniesses to check my work. Im not a proffesional writer and my grammar pretty much sucks. I write because I enjoy it and became interested in writing during a long period of ill health. Ive never reached black belt in anything, pre-black in two martial arts if that counts for anything. Ive never been into gradings, always more interested in just learning.
I write for beginners not experts. Ive found when reasearching for myself , everyone automatically assumes you already know the difference between a tsuba and a tsuska without explaining it. So I write enough to make someone interested, explain enough so they learn and just leave out enough so they have to go looking for it themselves if they read inbetween the lines. That way its more fun and helps to learn.
Ive done 4 years of Taekwondo when I was in high school which led onto 7 years of Hapkido before becoming involved with security work. It was the old days then. Never used any martial arts, no high kicks. All street fighting. I became involved in training again after my last operation. I sent 4 months in hospital and three months after getting back home I started private lessons in Kali, classes in Amok and seminars in Systema. That was four years ago. Ive also done Kinetic fighting level 3 with Paul Cale which I recommend to crowd controllers as it teaches working in pairs and controlling the head which is needed in todays crowd control business. Ive also trainied in Birankai Aikido weapons work in Jo and Bokken for two years. I try to teach myself Keysi Fighting method, Panatukan with Daniel sullivan and Defendo by DVD. I do a little mufilindo silat which I need to do more of and aim to try Krav-Maga at some point. When my finess level is up to it I also join in with JKD and Kick Boxing after Kali.
Ive had 2 back operations, four crushed discs L4-S1, nerve damage in both legs, scar tissue in right groin from a 90 litre blood transfusion which cut through my tendons, broken sternum, nerve damage in upper back and chest from two double lung transplants. Spent almost 12 years of my life on an oxygen hose and still trying to do rehab on the damage left in my joints from so long in a wheel chair and on operating tables and had to learn how to walk again three times. The last time I weighed 50 kilo coming out of 58 days in ICU.
I was training four nights a week, up at 630am walking my staffy, gym twice a week doing full body work outs in a maintenance routine, bike 15 minutes per day for cardio and the rest of the time I pretty much spend on pain killers. I only write occasionally now. Mainly when injuries flair up and I cant train, although I still try to make it to training to watch or when the doctors have pumped up my steroids to help me breath and Im up all night as I am now at 430am writing the last of this article.
Ill quote one of my Kali instructors sayings again to keep in with the theme and to finish up with.”Martial arts is 10 percent physical and 90 percent mental”. When you start training in the arts for rehabilitation, for me its become more spiritual.
A Humble Student of the Arts
This is my first review on this blog. So a little background. I started collecting knives in 2007 after being on the Hoods Woods Forum and had the opportunity to talk with Ron. I blame him for getting me into knives. Ill be the first to admit that it became a problem for me at one stage, but I was determined to learn for myself after reading forum after forum post on different steels, shapes sizes etc. I started off with two limited edition blades from Busse a battle mistress and a badger attack and my addiction grew from there. This was the days before Youtube and you couldnt just watch others experimenting. Ive gradually had to sell many of those to raise funds for various reasons and Im down to something under 80 blades. I buy the occasional one if my curiosity spikes. I mainly keep my favorites and ones I use the most.

The Gransfors Outdoor Axe was one of these curiosities. It reminded me of an American Tomahawk and there arent too many shops in Australia where you can actually view and handle blades or axes, its mostly internet sales here. I purchased the outdoor axe and I think I had it in my hands for less than 5 minutes and absolutely hated it. It felt very anemic to me. How was I meant to cut down a tree with this is all I could think.I swapped it to a mate for a Gransfors Bruks Wildlife Hatchet that I had sold him years before. It took me over six months before seeing a youtube clip by Joe Robinet using the outdoor axe for me to buy another.

He was using the axe like a large knife. Im a knife guy, preferring a large chopping knife over an axe for more control. Knives have that sweet spot and you control the power by shifting where on the blade you strike with. I realized the outdoor Axe was the European version of a large chopping knife in a country where you cant walk around with a large knife hanging off your belt but you can an axe. With the outdoor axe you use it the same as a large chopping knife but the power is controlled by where you place your hands on the handle. Chocking for finer work, halfway for more control and at the back for the greatest power stroke.
I had another Outdoor Axe within a week and am now preferring it to carrying a large knife for the timbers in the area in which I was living. At the time I was axe predigest. All I saw in them was either splitting sawn timber or cutting the front notch to down a tree. My kukris or goloks were just easier for me to use building/constructing items. I now have three Gransfors at the time of this writing, a wildlife hatchet that I use for removing stock for carving, a hunters Axe for splitting and limbing, of course the Outdoors which has become one of my favorite bushcraft tools.
I dont write the sort of review where I state the size, material and film what I use it on in a way that I would never use it in reality. I mainly say why I brought an item , how I use it, if its junk and why I either have sold it or decided to keep it. This just happens to be one of those tools where it grew on me over time and now is a part of my permanent kit.
Joe Robinet
The two shops where I purchase my axes from;
Dawn Mowers
https://dawnmowers.com.au/brands/gransfors-bruk-axes
Philip and Lea
I first saw the FireFly on Zachary Fowlers Makery and Mischief channel on Youtube, while he was carving a chess set with the small blade. Im still determined to carve a chess set myself. I couldnt find the FireFly at the time and purchased a Esse CR 2.5 being the closet I could find. I became enamored with small neck knives and eventually located the maker of the Firefly and purchased a Fowlers Grind model now made from D2 steel. Designed by Robert Weir and machined out of one piece 1/2 inch bar stock. The spine is sharpened to 90 degrees for striking against the inbuilt ferro rod. Approximately 100mm just under 4 inches it hangs around the neck quite comfortably, or can be used as a parasite blade for a larger knife.
Apart from being a blade and a ferro rod, when the rod is removed the tube can also be used as a whistle for signalling and the 3 foot paracord lanyard holds 21 feet of cordage unraveled. The belly of the blade is shaped to facilitate carving a divet in a fire-board.The round nonslip knurled handle can be spun in your hands to create the divet or used in conjunction with a bow to make a drill. As advertised “The best survival knife is the one you have with you”. This blade lets you carve, skin, signal, create shelter, fish, start fire , make a firebow,it can even be used as a wood file.
Its one of those little gadgets I prefer to carry like a wazoo Firecraft Necklace but the firefly combines a blade and ferro rod. I always like having a cutting tool and a fire starter on my person. It also makes a great escape and evasion tool. Im looking forward to putting the little blade through its paces.
The only bad thing I could possibly say is that if I choose again I would have picked the Gen 2 Bling Grind to have a sturdier tip. At the time of this writing I believe there are three different grinds available but so far I am very happy with my selection.


I purchased this old tool box many years ago from a local market and never quite knew where or how to use it. Then had the idea to use it for my bushcraft tools. I started by sanding it down with different grades of sanding blocks and paper until the black tar paint was removed and it was smooth enough to start using 0000 grade steel wool. Before applying coat after coat of Tung oil, sanding in between coates with the steel wool. Didnt turn out too bad.Pics below. This has worked out perfectly to store the tools I dont usually carry with me, such as pieces of Obsidian, Flint Knapping tools, Augers and Carving knives.

I walked past a Dandelion today (Taraxacum Officnale). Yes I know very exiting. However for the past few years Ive been studying with Al Ainsworth, Jake Cassar, Paul Kirkley and Craig Caudill and for the first time instead of just walking past a plant and not even bothering to look or know the name I was excited by actually knowing what it was and how to use it. Not only the Scientific name but also the Family Name (Asteraceae) and how to use the plant for food, medicinal and the nutritional properties.

Food Uses of Dandelion
The root has also traditionally been used to make a coffee substitute.
The leaves of the plant can be eaten as a salad or fresh vegetable. In Asian cooking, the leaves are used like lettuce, boiled, made into soup or fried.
The flower buds can be added to omelettes and fritters, the flowers baked into cakes. Blossoms make a wine or beer is brewed from the whole plant before it flowers.
Nutritional Profile
The greens contain vitamins A, C, E, K, B6, beta carotene, folate, thiamine, riboflavin, calcium, iron, potassium and manganese.
Medicinal Uses
Polyphenols in the leaves fight inflammation in the body, Dandelion roots and leaves were used to treat liver problems. Native Americans boiled dandelion to treat kidney disease, swelling, skin problems, heartburn, and upset stomach. In traditional Chinese medicine, dandelion has been used to treat stomach problems, appendicitis, and breast problems, such as inflammation or lack of milk flow. In Europe, dandelion was used in remedies for fever, boils, eye problems, diabetes, and diarrhea.
With all the studies Ive been doing for the past few years I dont look at things quite the same way as I did before, not just plants but also trees, knots, anything really and not just how to identify and use but also how to apply things in a sustainable methodology. The locals must have thought I was stoned, just standing there in the middle of a roadway looking at a weed. One of those days when a simple flower can bring so much enlightenment.
© 2026 Serat Bushcraft
Theme by Anders Noren — Up ↑